4 March 2024 Update:
The game has now reenabled support for Moonlight streaming, thus the method described in this article is no longer necessary.
The renowned friendship-ending PvE game “Helldivers 2” was recently launched, and as a helldivers 1 player, I eagerly welcomed it with open arms. After playing it for a few days, my impression is that while it has quite lots of bugs, it doesn’t have any major issues, and remains as authentic and true to its roots as ever.
However, on February 16th, when I launched the game from within the Moonlight streaming desktop as usual, all my inputs ceased to work: there was no response to any keyboard or mouse events. I ran over to check the computer in the cabinet and did not find any issues. After closing the game, the keyboard and mouse in Moonlight started working again, so I could only assume that it was the game’s anti-cheat mechanism that blocked the input events from Sunshine during streaming. Later, I also found on Reddit that other players had encountered the same problem:
Has anyone figured out how to get Helldivers 2 to work yet?
As a dedicated streaming user, I certainly can’t give up gaming over this minor obstacle, so I did some research and discovered quite a few solutions for implementing USB over IP/Ethernet:
- VirtualHere is a commercial software that offers a one-stop solution for remote USB connection. However, this software requires a payment of $45 to unlock the connection of multiple devices. Additionally, the purchased license can only be used on one device.
- USB/IP Project is an open-source initiative that has been around for some time and does not have the restrictions of the aforementioned commercial software.
Since I really didn’t want to spend the $45 (if it had been a floating license, I might have actually paid, as it seemed quite convenient upon trial), I dug out my long-unused Raspberry Pi. After updating the software repositories, all I needed to do was execute sudo apt install usbip to complete the installation of the server-side software. To conveniently run usbipd in the background, we can prepare a systemd unit like this:
|
|
After starting this daemon, you can view the USB devices connected to the current device by using the command sudo usbip list -l:
|
|
We can then use a command to make the related kernel module take control of this USB device; taking the example of the mouse receiver above: sudo usbip bind -b 1-1.3.
Next, go to the Windows PC to install the necessary software and drivers for the Client. This can be done by referring directly to the description in the README of the USB/IP for Windows repository; I will not go into further detail here.
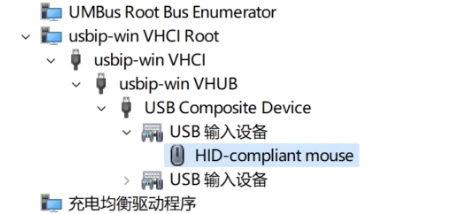
After completing the driver installation, we only need to execute the command usbip.exe attach -r raspberrypi.local -b 1-1.3 to directly connect the mouse receiver to the Windows gaming machine. The same method can be applied to continue connecting other devices you want, such as a USB keyboard and gamepad. This way, we can happily engage in gaming.