最近在厂里小团队内做了一次关于 WebAssembly 这个不算新潮但也毫无热度的技术的科普分享,大概的讲了一下 asm.js 和 WebAssembly 的发展过程,并用著名《周末在家实现光纤追踪》中的代码为例,展示了一下 WebAssembly 相对优秀的性能表现(优秀当然是和 JavaScript 这个扶不起的语言比啦)。我自己呢之前也搞了个把 CoreMark 跑在 WebAssembly 的小实验,可以很粗暴的对 CPU 性能做一个跑分,但都没有很详细的记录这个过程我都干了些什么,于是打算水一片记录一下 ,以防以后有用还要从头摸索 。
安装 Emscripten
Emscripten 是 WebAssembly 的工具链,我们需要手动安装。这个过程并不复杂,可以查看官方文档来了解详细的安装方法。简单来说,我们只需要执行以下命令即可完成安装和激活:
1
2
3
4
5
|
git clone https://github.com/emscripten-core/emsdk.git
cd emsdk
./emsdk install latest
./emsdk activate latest
source ./emsdk_env.sh
|
很显然这种安装方式只会在当前 shell 生效,如果有需求可以把 source ./emsdk_env.sh 放到当前 shell 的初始化脚本中,此处不再赘述。
获取并修改「Ray Tracing in One Weekend」的源码
这是一本比较有名的光线追踪入门科普读物(?),大家可以点击这个链接来阅读:Ray Tracing in One Weekend,最终实现的代码大家也可以在本书的源码中找到,这次我们直接用教材的参考答案就行了,并不打算自己从头撸一个。
直接用原有的代码编译到 WebAssembly 当然没问题,但是实际上我打算做一些优化:
- 标准答案输出的图片方式是在
std::cout 输出 PPM,我们可以直接改成在 WASM 的内存中 allocate 一个 bitmap 并直接更新;
- 标准答案输出进度的方式是在
std::clog 输出 Scanline remaining xx,我们可以改成调用一个 JavaScript 函数,把进度输出到 JavaScript console 中,并把上面提到的 bitmap 绘制到 canvas 里,让大家伙可以直接看到进度。
我们先处理一下负责摄像机的 camera.h,这里我增加了一个 extern void report_number(number); 的定义,具体的实现后续会在 JavaScript 中补充,来实现上面优化中的第二点:
 1
 2
 3
 4
 5
 6
 7
 8
 9
10
11
12
13
14
15
16
17
18
19
20
21
22
23
24
25
26
27
28
29
30
31
32
33
34
35
36
37
38
39
40
41
42
43
44
45
46
47
48
49
50
51
52
53
54
55
56
57
58
59
60
61
62
|
@@ -17,16 +17,18 @@
 #include "hittable.h"
 #include "material.h"

-#include <iostream>
-
+extern void report_number(int);

 class camera {
   public:
     double aspect_ratio      = 1.0;  // Ratio of image width over height
     int    image_width       = 100;  // Rendered image width in pixel count
+    int    image_height;             // Rendered image height
     int    samples_per_pixel = 10;   // Count of random samples for each pixel
     int    max_depth         = 10;   // Maximum number of ray bounces into scene

+    uint8_t *image_buffer = nullptr; // Bitmap for rendered image.
+
     double vfov     = 90;              // Vertical view angle (field of view)
     point3 lookfrom = point3(0,0,-1);  // Point camera is looking from
     point3 lookat   = point3(0,0,0);   // Point camera is looking at
@@ -37,26 +39,25 @@ class camera {

     void render(const hittable& world) {
         initialize();
-
-        std::cout << "P3\n" << image_width << ' ' << image_height << "\n255\n";
+        auto p = this->image_buffer;

         for (int j = 0; j < image_height; ++j) {
-            std::clog << "\rScanlines remaining: " << (image_height - j) << ' ' << std::flush;
+            if (j % 10 == 0)
+              report_number(image_height - j);
+            // std::clog << "\rScanlines remaining: " << (image_height - j) << ' ' << std::flush;
             for (int i = 0; i < image_width; ++i) {
                 color pixel_color(0,0,0);
                 for (int sample = 0; syyample < samples_per_pixel; ++sample) {
                     ray r = get_ray(i, j);
                     pixel_color += ray_color(r, max_depth, world);
                 }
-                write_color(std::cout, pixel_color, samples_per_pixel);
+                write_color(pixel_color, samples_per_pixel, p);
+                p += 4;
             }
         }
-
-        std::clog << "\rDone.                 \n";
     }

   private:
-    int    image_height;    // Rendered image height
     point3 center;          // Camera center
     point3 pixel00_loc;     // Location of pixel 0, 0
     vec3   pixel_delta_u;   // Offset to pixel to the right
@@ -68,6 +69,7 @@ class camera {
     void initialize() {
         image_height = static_cast<int>(image_width / aspect_ratio);
         image_height = (image_height < 1) ? 1 : image_height;
+        this->image_buffer = new uint8_t[image_height * image_width * 4];

         center = lookfrom;
|
以及负责颜色的 color.h:
 1
 2
 3
 4
 5
 6
 7
 8
 9
10
11
12
13
14
15
16
17
18
19
20
21
22
23
24
25
26
27
28
29
30
31
32
33
|
@@ -13,8 +13,6 @@

 #include "vec3.h"

-#include <iostream>
-
 using color = vec3;

 inline double linear_to_gamma(double linear_component)
@@ -22,7 +20,7 @@ inline double linear_to_gamma(double linear_component)
     return sqrt(linear_component);
 }

-void write_color(std::ostream &out, color pixel_color, int samples_per_pixel) {
+void write_color(color pixel_color, int samples_per_pixel, uint8_t *buffer) {
     auto r = pixel_color.x();
     auto g = pixel_color.y();
     auto b = pixel_color.z();
@@ -40,9 +38,11 @@ void write_color(std::ostream &out, color pixel_color, int samples_per_pixel) {

     // Write the translated [0,255] value of each color component.
     static const interval intensity(0.000, 0.999);
-    out << static_cast<int>(256 * intensity.clamp(r)) << ' '
-        << static_cast<int>(256 * intensity.clamp(g)) << ' '
-        << static_cast<int>(256 * intensity.clamp(b)) << '\n';
+
+    *(buffer + 0) = static_cast<int>(256 * intensity.clamp(r));
+    *(buffer + 1) = static_cast<int>(256 * intensity.clamp(g));
+    *(buffer + 2) = static_cast<int>(256 * intensity.clamp(b));
+    *(buffer + 3) = 255;
 }
|
最后我们再修改修改入口的 main.cc,增加几个函数用来给 JavaScript 获取一些画布的参数,以及给 main 函数改了个名:
 1
 2
 3
 4
 5
 6
 7
 8
 9
10
11
12
13
14
15
16
17
18
19
20
21
22
23
24
25
26
27
28
29
30
31
32
33
34
35
36
37
38
39
40
41
42
43
44
45
46
47
48
49
|
@@ -9,6 +9,7 @@
 // along with this software. If not, see <http://creativecommons.org/publicdomain/zero/1.0/>.
 //==============================================================================================

+#include <emscripten.h>
 #include "rtweekend.h"

 #include "camera.h"
@@ -17,8 +18,24 @@
 #include "material.h"
 #include "sphere.h"

+camera& get_camera() {
+  static camera cam;
+  return cam;
+}
+
+EMSCRIPTEN_KEEPALIVE int get_height() {
+  return get_camera().image_height;
+}
+
+EMSCRIPTEN_KEEPALIVE int get_width() {
+  return get_camera().image_width;
+}
+
+EMSCRIPTEN_KEEPALIVE uint8_t* get_buffer() {
+  return get_camera().image_buffer;
+}

-int main() {
+EMSCRIPTEN_KEEPALIVE int run() {
     hittable_list world;

     auto ground_material = make_shared<lambertian>(color(0.5, 0.5, 0.5));
@@ -61,7 +78,7 @@ int main() {
     auto material3 = make_shared<metal>(color(0.7, 0.6, 0.5), 0.0);
     world.add(make_shared<sphere>(point3(4, 1, 0), 1.0, material3));

-    camera cam;
+    camera& cam = get_camera();

     cam.aspect_ratio      = 16.0 / 9.0;
     cam.image_width       = 1200;
@@ -77,4 +94,5 @@ int main() {
     cam.focus_dist    = 10.0;

     cam.render(world);
+    return 0;
 }
|
完成这些改动之后,我们就可以把这份代码编译成 wasm 二进制了!
1
2
3
|
$ emcc -o hello.wasm main.cc -Wall --no-entry -s ERROR_ON_UNDEFINED_SYMBOLS=0 -O3
$ file main.wasm
main.wasm: WebAssembly (wasm) binary module version 0x1 (MVP)
|
到此为止 “native” 侧相关的工作就已经都完成了。
编写 JavaScript 胶水代码
众所周知 WebAssembly 代码是不能被浏览器直接执行的,所以我们需要准备一点“胶水”代码,来加载 wasm 文件,并提供必需的外部定义函数:
 1
 2
 3
 4
 5
 6
 7
 8
 9
10
11
12
13
14
15
16
17
18
19
20
21
22
23
24
25
26
27
28
29
30
31
32
33
34
35
36
37
38
39
40
41
42
43
44
45
46
47
48
|
WebAssembly.instantiateStreaming(fetch("main.wasm"), {
  env: {
    _Z13report_numberi: function (num) {
      console.log(`report_number called: ${num}`);
      const resultAddress = results.instance.exports._Z10get_bufferv();
      const width = results.instance.exports._Z9get_widthv();
      const height = results.instance.exports._Z10get_heightv();

      const memoryView = new Uint8ClampedArray(results.instance.exports.memory.buffer, resultAddress, width * height * 4)
      postMessage({
        kind: 'IMAGE_DATA',
        width,
        height,
        memoryView,
      })
    }
  },
  wasi_snapshot_preview1: {
    clock_res_get: function () { console.info('warning: clock_res_get called, function not implemented'); return 0 },
    clock_time_get: function () { console.info('warning: clock_time_get called, function not implemented'); return 0 },
    fd_write: function () { console.info('warning: fd_write called, function not implemented'); return 0 },
    fd_read: function () { console.info('warning: fd_read called, function not implemented'); return 0 },
    fd_close: function () { console.info('warning: fd_close called, function not implemented'); return 0 },
    fd_seek: function () { console.info('warning: fd_seek called, function not implemented'); return 0 },
    proc_exit: function () { console.info('warning: proc_exit called, function not implemented'); return },
    fd_fdstat_get: function () { console.info('warning: fd_fdstat_get called, function not implemented'); return 0 },
  }
}).then(
    (results) => {
      globalThis.results = results;

      console.time('wasm code')
      results.instance.exports._Z3runv();
      console.timeEnd('wasm code')

      const resultAddress = results.instance.exports._Z10get_bufferv();
      const width = results.instance.exports._Z9get_widthv();
      const height = results.instance.exports._Z10get_heightv();

      const memoryView = new Uint8ClampedArray(results.instance.exports.memory.buffer, resultAddress, width * height * 4)
      postMessage({
        kind: 'IMAGE_DATA',
        width,
        height,
        memoryView,
      })
    },
  );
|
其中,wasi_snapshot_preview1 传入了很多 C runtime 需要的函数,因为我十分确信代码没有使用这些函数,所以就挂了一堆垃圾进去。同时,在 env 中,我增加了一个 _Z13report_numberi 函数,执行的逻辑就是从若干 C 函数和参数中拿到画布的宽高,并将绘制结果通过 postMessage 函数传递给我们的 UI 线程。因为 WebAssembly 的执行也会阻塞其他代码,所以很显然这段 JavaScript 代码是在 worker 中执行的。
最后我们再准备一个入口的 HTML 文件就大功告成啦:
 1
 2
 3
 4
 5
 6
 7
 8
 9
10
11
12
13
14
15
16
17
18
19
20
21
22
|
<!DOCTYPE html>
<html>
  <head>
    <meta charset="utf-8" />
  </head>
  <body>
    <canvas width="256" height="256" style="width: 256; height: 256;"></canvas>
    <script>
    const worker = new Worker("worker.js");
    worker.onmessage = (e) => {
      if (e.data.kind !== 'IMAGE_DATA') return;
      const imageData = new ImageData(e.data.memoryView, e.data.width, e.data.height, {});
      const canvas = document.querySelector('canvas')
      canvas.width = e.data.width;
      canvas.height = e.data.height;
      const ctx = canvas.getContext('2d');

      ctx.putImageData(imageData, 0, 0)
    }
    </script>
  </body>
</html>
|
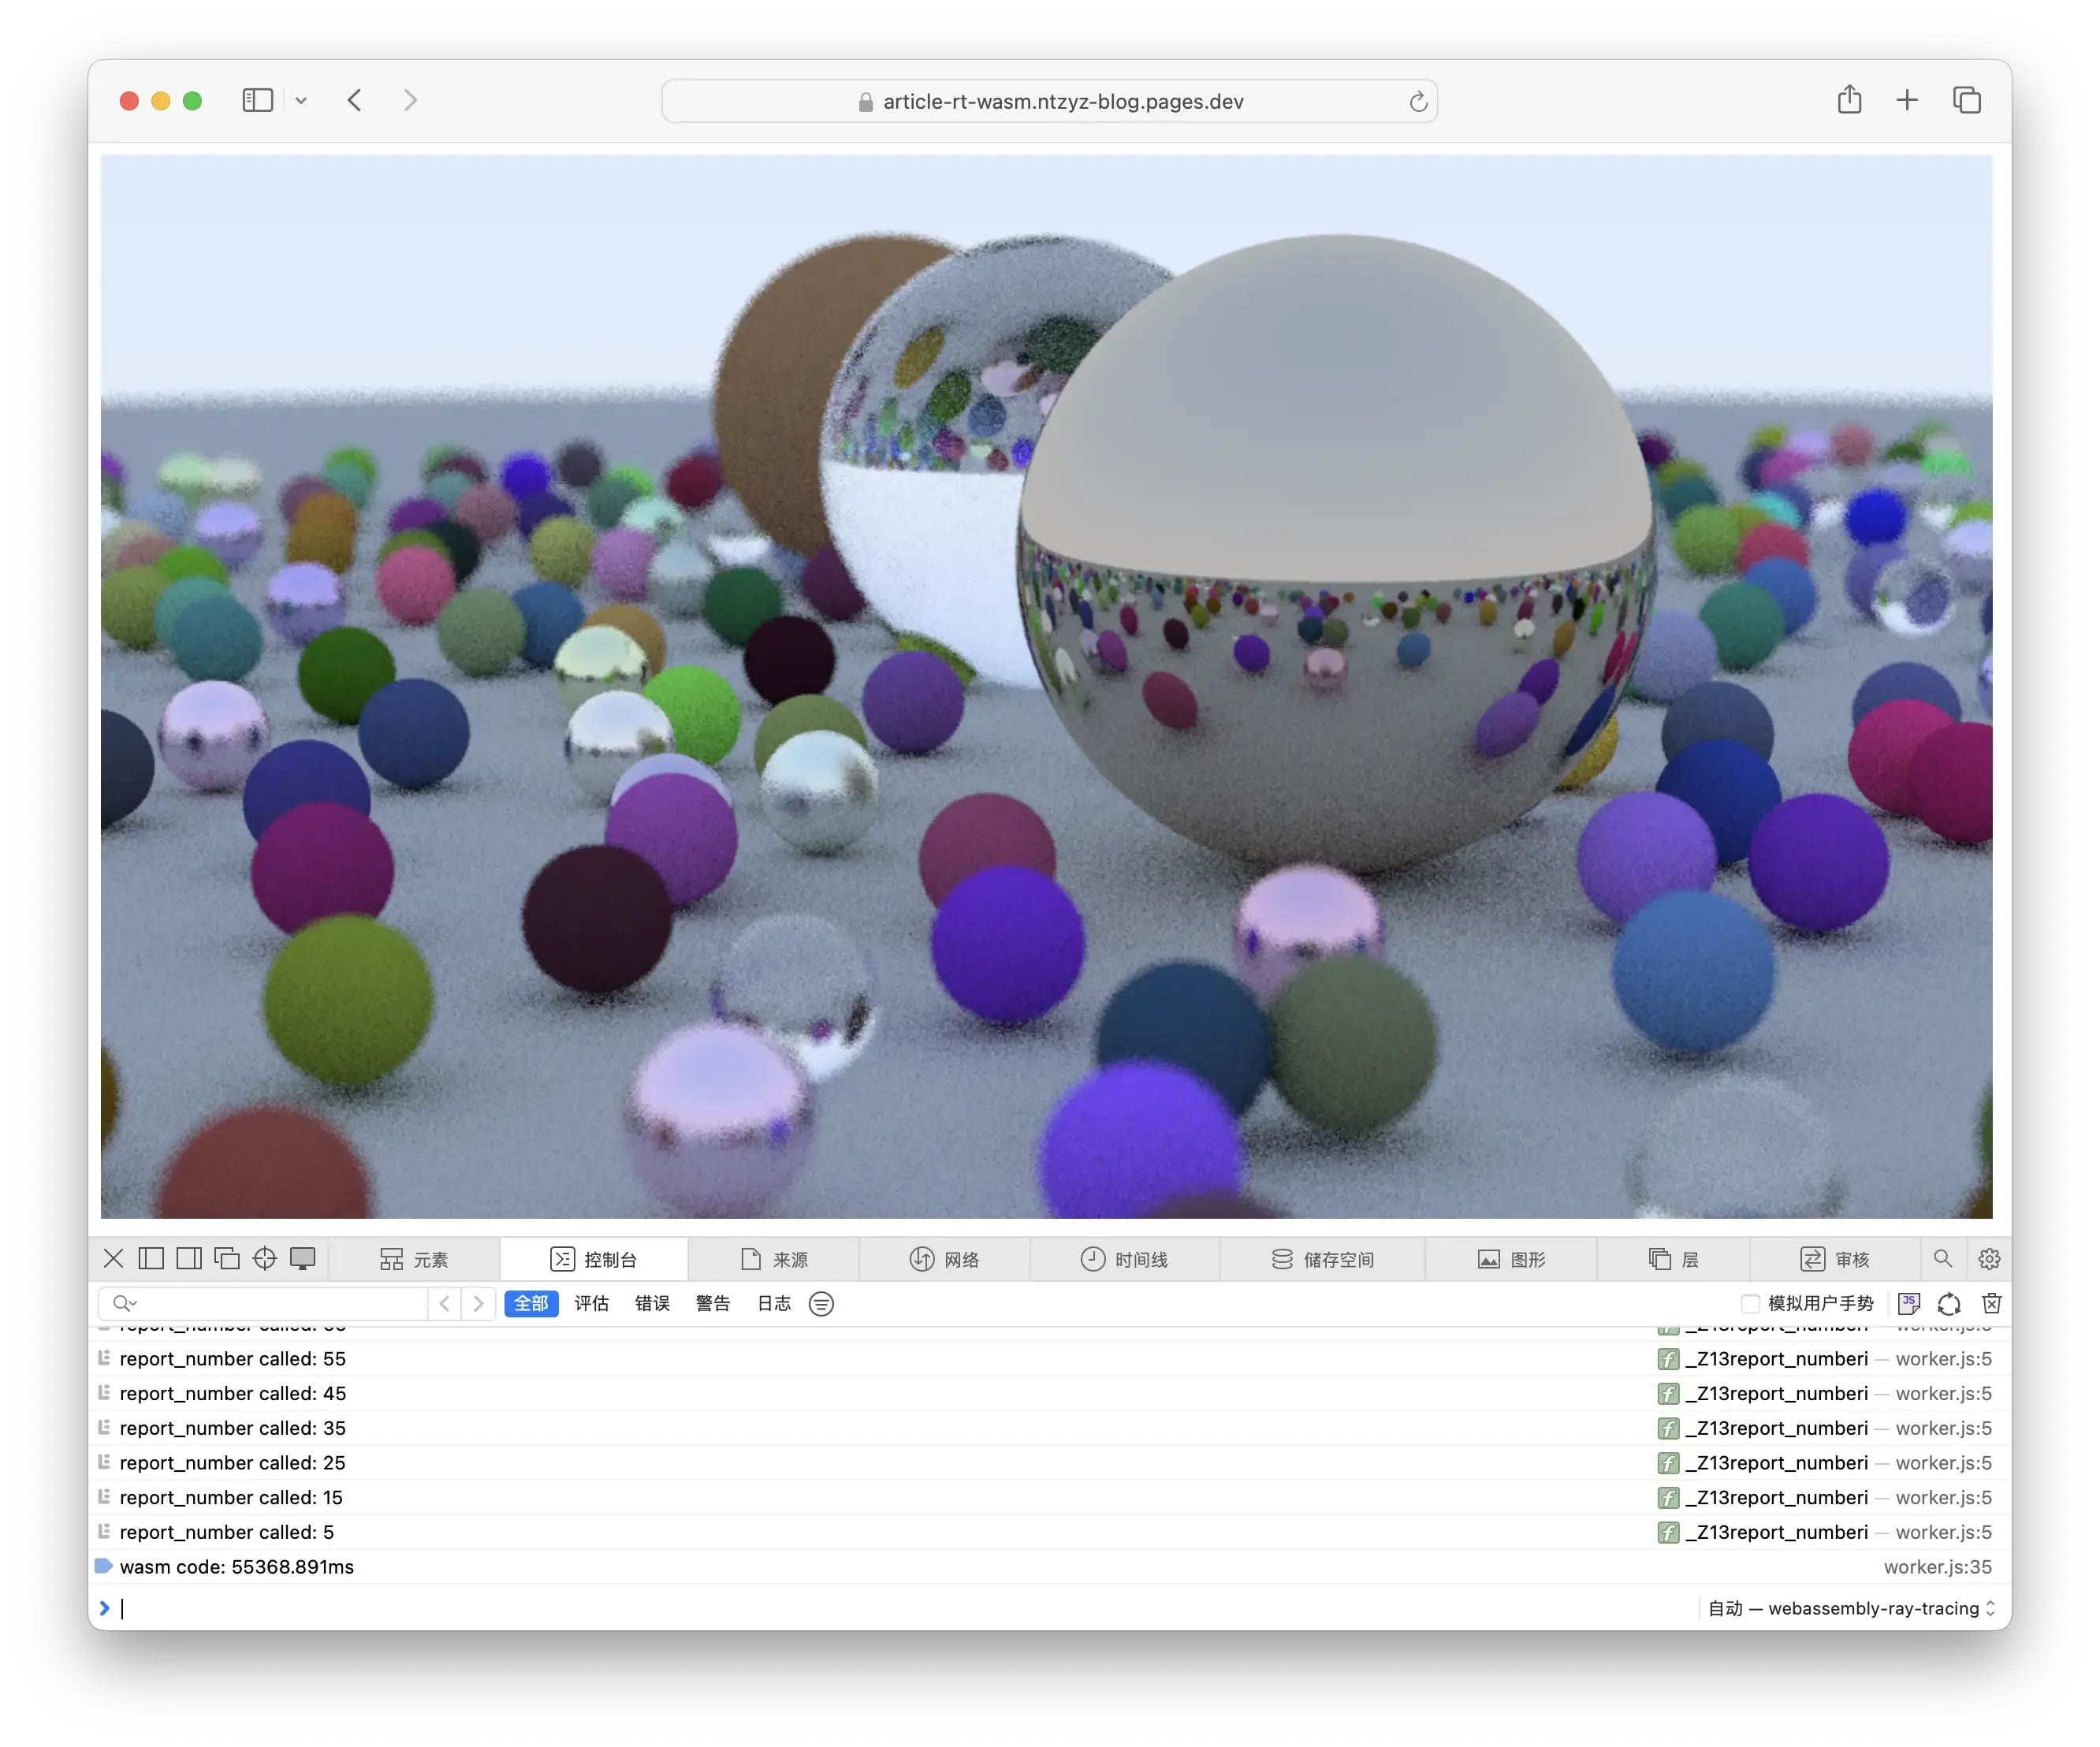
亲自试一试
相关产物我也放到自己的 Blog 中,大家可以直接打开这个链接来查看效果!